Friday, February 7, 2014

Multiple Remote Instances on a Budget

By Jim McGuinness, Product Support Specialist

We are always looking for ways to maximize the design for our customers to yield the biggest bang for the buck.  Sometimes customers would like more than one remote.  If your customer is looking for the same functionality, just multiple locations of the same remote and its functions, we have a little trick you can use.  The only requirement is that the ZM-9001 remote is the remote of choice for your project where a scene, page, or volume up and down are the functions to be used.
ZM-9001 Remote

Now we can’t change the programming requirement for the mixer which is a maximum of two 2-wire remote controls being used on a 9000M2 series mixer, and this will not work if the ZM-9002 remote is required for the project.  However, we can wire in multiple ZM-9001s on a single remote port.


ZM-9002 Remote

Now the programming technique will not change for this multiple remote trick.  You would program the remote control the way you always would.  The screenshots are shown below.


First click on Setting to get the drop down menu.
Then click on Remote Setting Wizard
You will then get a display for the remote settings.
Select ZM-9001 for Remote Volume 1
You will then get the options you can set for the remote.  Displayed are the popular settings.
If Page is selected as shown for the ZM-IN2 button below, you will get a drop down menu to select
the contact closure input to use on the back panel of the mixer’s chassis and as a trigger for the Page
Event programming.


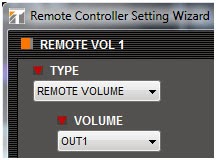
As you can see, any of the scenes can be chosen, and any input or output can be selected to
be controlled when Volume is selected as a function.  Additionally, the resolution of the volume change can be set as well.

 So what’s left?  Just wire as many ZM-9001 remotes to the remote port that has been programmed in standard parallel fashion.  Just be sure to connect them all the same way.  DO NOT mix the “E” and “Out” connections.  You can also daisy chain one remote to the next, if home run wiring is not being done.  That’s it!

Now you may have noticed you have a Remote Volume 2 shown above.  This is for your 2nd
2-wire remote port.  You can do the same thing with this remote option as well.  Double bang for the buck!  This option, if your project can make use of it, will save you a few hundred dollars minimum over using the serial remotes.  Now the 2-wire remotes and serial remotes each have their own advantages, but this is a simple cost saving control option where applicable.

Some last thoughts.


This could give you volume up and down for 6 inputs, 6 outputs, or combination of 6 input and output channels in a standard 2-gang electrical box with multiple instances.  You also could use our trick on one port and use a ZM-9002 on the second port.  With this combination, you could as an example, program the ZM-9001 port for volume change for 3 input channels and program the ZM-9002 port so the rotary volume control is used as an output volume control and then program the four buttons for scene change.  This would be a great solution when using an A-9060SM2, A-9120SM2 or A-9240SHM2 where the requirements of the project match the maximum number of channels, pages and volume settings to be controlled by ZM-9001 and ZM-9002 remotes.  An example of this might be a restaurant where the single ZM-9002 would be located at the bar for scene and output volume control and multiple instance input volume controls would be located around the eating area for up to three sources.

Happy installing!

Thursday, February 6, 2014

9000M2 Software Part 11 - Paging Settings


In this tutorial you will learn how to adjust Paging settings  with the TOA 9000m2 GUI Software application. 

Click the PAGING Button to open the PAGING Setting View. Here you will find priority input sources, trigger functions and output assignments. All settings are stored independent of scene memory.

Here You can program up to 32 Paging presets.

To program a Paging Preset, first select the priority input Source.

Then, Select the Trigger that will activate the paging preset--this may be a contact closure, a button press from a remote controller keypad, or Vox threshold.

Then, indicate which outputs the page will be assigned.

Also, a page can be used to synchronize a contact output relay, this may be useful to trigger an external piece of equipment. You may sync up to 12 contact outputs when using the C-001 Expansion Card.

Finally, you can assign the priority mode to indicate what happens when multiple sources with the same priority are fed through an output at the same time: Last in First out, First in First out, or all sources mixed at the same time.

Wednesday, January 8, 2014

Tech Tip: D-901 EQ Settings for TOA Speakers Made Easy

By Jim McGuinness, Product Support Specialist

As we all have heard before time is money, and no one understands that better than the custom integrator or installer.  For many jobs, much time and effort goes into the design and deployment of a new sound system.  Since many electronic products are programmable these days, time spent on setting up a unit, or group of units to finish a system, is always a concern.  Realistically hours can be spent which can burn up your profit ratio on a job.  Even if the setup goes perfectly, time just tweaking a new system is costly.  Ultimately, you’re trying to hit that sweat spot of profitable job and happy client for future business.

So in comes the question of how can we save time when installing TOA speakers in conjunction with the D-901 mixer.  Well we’ve just made it a little easier by taking advantage of some of the flexibility of the D-901’s multi-iteration capable software.  We now have several files which contain the EQ curves for many of our popular speakers which can be used like a template.  These files can be found at the following link.  Having these two files independently opened along with your project file allow you to copy paste the filters from the template EQ files to your project file for the output filters needed.

The first thing you will need to do is download the template zip file from our website to your
Windows compatible computer.  You will then need to unzip the file to obtain the two .d9t files which can be saved to your 'My Documents' folder or any folder you decide to place them in.


The second step you should do is to open your project file and have it ready on your computer.  The screenshot below is a general example to go to a file location and open a file.
The next step is to open two more iterations of the D-901 software on your PC.  Then for each iteration, use the 'Open File' icon again on your tool bar to locate your .d9t template files and open one file in each of your two additional iterations of the software.  
TIP:  If the type or types of TOA speakers that need to be used all reside on one of these template files, then only the template file of interest needs to be open.

Below you will find the screenshots of these steps.  Note that once you open the template files with the software, the speaker names will appear as preset memory names.

Open file example.

Speaker EQs shown as presets once the file is loaded.
To select a particular EQ curve, let’s say the HX-5 in this example, click on the HX-5 Output Filter preset and click on 'Change'.
Then click on the output filter button for any of the output channels to reveal the stored EQ curve.
The output EQ curve will be displayed as shown.
Now that you have the EQ curve of interest loaded, right hand click the same output filter button to reveal additional options and select 'Copy'.
The last step will be to switch over to your project D-901 software, click on the output filter button for the channel that has the HX-5 speaker on it and select 'Paste'.  If you have more than one channel with the HX-5 speaker on it, you will need to past the EQ settings for each channel separately.

You will be able to verify the EQ curve in the graphical display at the bottom portion of the software each time you paste an EQ curve into your project.

Lastly when you go to close the template files it will ask you if you want to save the changes as the software has detected a functional change.  Say NO to Save file for your Template files and YES to your project file as you don’t want to lose your work.

That’s it, simple and easy, especially if you have several models of speakers you are working with.

Happy programming!

9000M2 Software Series Part 10 - Setting Paging Priority and Volume Settings


In this tutorial you will learn how to assign paging priority and adjust paging volume with the TOA 9000m2 GUI Software application.

Before we start, it is important to keep in mind that paging priority is stored in global memory. This means that paging settings will remain regardless of scene changes. This is helpful in many cases--for example, if a user turns down the master volume in a particular room, an important page from a priority microphone will consistently operate with the same programmed behavior and volume no matter what.

First, you may open the priority setting view by clicking the priority button. You can also find this in the Setting Menu.

Next, you may assign a priority with a level 1 through 3 to any input. 1 is the highest priority, and 3 is lowest priority. A blank assignment indicates no priority.
 

Then, you can indicate if this priority input will be triggered by a VOX threshold. This means that the input will be triggered when an audio signal exceeds a certain threshold.

Keep in mind that in order to use the VOX, the channel's Gate setting must be turned on. See our video on Gate settings to learn how to turn a channel's gate on.

Next, set the ducking level: the Ducking Level is  the amount that the source will be reduced when a signal of higher priority is activated. In this example. When a page comes in through channel 1, channel 2 will be ducked by -40dB.

To adjust the paging volume, click the Paging Volume Button. As mentioned earlier, these volume settings are independent of normal output volume settings.

Tuesday, December 10, 2013

TOA 9000M2 Software Part 9 - Output Assignments & Crosspoints

Setting Output Assignments


In this tutorial you will learn how to configure output assignments  with the TOA 9000M2 GUI Software application.

Click on the Crosspoint Matrix block to call up the output Assignment view.

The crosspoint matrix represents inputs assigned to outputs with inputs represented as rows and outputs represented as columns.

New projects default to all inputs assigned to all outputs, represented by orange box. Clicking a box will turn the box to RED and will activate the cross-point fader. This fader adjusts the selected input channel's contribution to that output channel.

Click the button again to turn the output assignment off.

Keep in Mind that any source input that has been assigned assigned with a priority will not be included in this view. Priority inputs are managed in the paging settings. In this example Input 2 has been assigned a priority and is therefor not included in the output assignment view.

You may click the ADJUST button to transmit your Output Assignment settings to a connected 9000M2 unit.


Be sure to visit our YouTube page for more 9000M2 Software tutorials.